 kubernetes(七) Pod 调度
在默认情况下,一个 Pod 在哪个 Node 节点上运行,是由 Scheduler 组件采用相应的算法计算出来的,这个过程是不受人工控制的。但是在实际使用中,这并不满足的需求,因为很多情况下,我们想控制某些 Pod 到达某些节点上,那么应该怎么做呢?这就要求了解 kubernetes 对 Pod 的调度规则,kubernetes 提供了四大类调度方式:
- 自动调度:运行在哪个节点上完全由 Scheduler 经过一系列的算法计算得出
- 定向调度:NodeName、NodeSelector
- 亲和性调度:NodeAffinity、PodAffinity、PodAntiAffinity
- 污点(容忍)调度:Taints、Toleration
# 定向调度
定向调度,指的是利用在 pod 上声明 nodeName 或者 nodeSelector,以此将 Pod 调度到期望的 node 节点上。注意,这里的调度是强制的,这就意味着即使要调度的目标 Node 不存在,也会向上面进行调度,只不过 pod 运行失败而已。
NodeName
NodeName 用于强制约束将 Pod 调度到指定的 Name 的 Node 节点上。这种方式,其实是直接跳过 Scheduler 的调度逻辑,直接将 Pod 调度到指定名称的节点。
接下来,实验一下:创建一个 pod-nodename.yaml 文件
apiVersion: v1
kind: Pod
metadata:
  name: pod-nodename
  namespace: dev
spec:
  containers:
  - name: nginx
    image: nginx:1.17.1
  nodeName: node1 # 指定调度到node1节点上
2
3
4
5
6
7
8
9
10
#创建Pod
[root@k8s-master01 ~]# kubectl create -f pod-nodename.yaml
pod/pod-nodename created

#查看Pod调度到NODE属性,确实是调度到了node1节点上
[root@k8s-master01 ~]# kubectl get pods pod-nodename -n dev -o wide
NAME           READY   STATUS    RESTARTS   AGE   IP            NODE      ......
pod-nodename   1/1     Running   0          56s   10.244.1.87   node1     ......

# 接下来,删除pod,修改nodeName的值为node3(并没有node3节点)
[root@k8s-master01 ~]# kubectl delete -f pod-nodename.yaml
pod "pod-nodename" deleted
[root@k8s-master01 ~]# vim pod-nodename.yaml
[root@k8s-master01 ~]# kubectl create -f pod-nodename.yaml
pod/pod-nodename created

#再次查看,发现已经向Node3节点调度,但是由于不存在node3节点,所以pod无法正常运行
[root@k8s-master01 ~]# kubectl get pods pod-nodename -n dev -o wide
NAME           READY   STATUS    RESTARTS   AGE   IP       NODE    ......
pod-nodename   0/1     Pending   0          6s    <none>   node3   ......
2
3
4
5
6
7
8
9
10
11
12
13
14
15
16
17
18
19
20
NodeSelector
NodeSelector 用于将 pod 调度到添加了指定标签的 node 节点上。它是通过 kubernetes 的 label-selector 机制实现的,也就是说,在 pod 创建之前,会由 scheduler 使用 MatchNodeSelector 调度策略进行 label 匹配,找出目标 node,然后将 pod 调度到目标节点,该匹配规则是强制约束。
接下来,实验一下:
1 首先分别为 node 节点添加标签
[root@k8s-master01 ~]# kubectl label nodes node1 nodeenv=pro
node/node2 labeled
[root@k8s-master01 ~]# kubectl label nodes node2 nodeenv=test
node/node2 labeled
2
3
4
2 创建一个 pod-nodeselector.yaml 文件,并使用它创建 Pod
apiVersion: v1
kind: Pod
metadata:
  name: pod-nodeselector
  namespace: dev
spec:
  containers:
  - name: nginx
    image: nginx:1.17.1
  nodeSelector:
    nodeenv: pro # 指定调度到具有nodeenv=pro标签的节点上
2
3
4
5
6
7
8
9
10
11
#创建Pod
[root@k8s-master01 ~]# kubectl create -f pod-nodeselector.yaml
pod/pod-nodeselector created

#查看Pod调度到NODE属性,确实是调度到了node1节点上
[root@k8s-master01 ~]# kubectl get pods pod-nodeselector -n dev -o wide
NAME               READY   STATUS    RESTARTS   AGE     IP          NODE    ......
pod-nodeselector   1/1     Running   0          47s   10.244.1.87   node1   ......

# 接下来,删除pod,修改nodeSelector的值为nodeenv: xxxx(不存在打有此标签的节点)
[root@k8s-master01 ~]# kubectl delete -f pod-nodeselector.yaml
pod "pod-nodeselector" deleted
[root@k8s-master01 ~]# vim pod-nodeselector.yaml
[root@k8s-master01 ~]# kubectl create -f pod-nodeselector.yaml
pod/pod-nodeselector created

#再次查看,发现pod无法正常运行,Node的值为none
[root@k8s-master01 ~]# kubectl get pods -n dev -o wide
NAME               READY   STATUS    RESTARTS   AGE     IP       NODE
pod-nodeselector   0/1     Pending   0          2m20s   <none>   <none>

# 查看详情,发现node selector匹配失败的提示
[root@k8s-master01 ~]# kubectl describe pods pod-nodeselector -n dev
.......
Events:
  Type     Reason            Age        From               Message
  ----     ------            ----       ----               -------
  Warning  FailedScheduling  <unknown>  default-scheduler  0/3 nodes are available: 3 node(s) didn't match node selector.
2
3
4
5
6
7
8
9
10
11
12
13
14
15
16
17
18
19
20
21
22
23
24
25
26
27
28
# 亲和性调度
介绍了两种定向调度的方式,使用起来非常方便,但是也有一定的问题,那就是如果没有满足条件的 Node,那么 Pod 将不会被运行,即使在集群中还有可用 Node 列表也不行,这就限制了它的使用场景。
基于上面的问题,kubernetes 还提供了一种亲和性调度(Affinity)。它在 NodeSelector 的基础之上的进行了扩展,可以通过配置的形式,实现优先选择满足条件的 Node 进行调度,如果没有,也可以调度到不满足条件的节点上,使调度更加灵活。
Affinity 主要分为三类:
- nodeAffinity (node 亲和性): 以 node 为目标,解决 pod 可以调度到哪些 node 的问题
- podAffinity (pod 亲和性) : 以 pod 为目标,解决 pod 可以和哪些已存在的 pod 部署在同一个拓扑域中的问题
- podAntiAffinity (pod 反亲和性) : 以 pod 为目标,解决 pod 不能和哪些已存在 pod 部署在同一个拓扑域中的问题
关于亲和性 (反亲和性) 使用场景的说明:
亲和性:如果两个应用频繁交互,那就有必要利用亲和性让两个应用的尽可能的靠近,这样可以减少因网络通信而带来的性能损耗。
反亲和性:当应用的采用多副本部署时,有必要采用反亲和性让各个应用实例打散分布在各个 node 上,这样可以提高服务的高可用性。
NodeAffinity
首先来看一下 NodeAffinity 的可配置项:
pod.spec.affinity.nodeAffinity
  requiredDuringSchedulingIgnoredDuringExecution  Node节点必须满足指定的所有规则才可以,相当于硬限制
    nodeSelectorTerms  节点选择列表
      matchFields   按节点字段列出的节点选择器要求列表
      matchExpressions   按节点标签列出的节点选择器要求列表(推荐)
        key    键
        values 值
        operator 关系符 支持Exists, DoesNotExist, In, NotIn, Gt, Lt
  preferredDuringSchedulingIgnoredDuringExecution 优先调度到满足指定的规则的Node,相当于软限制 (倾向)
    preference   一个节点选择器项,与相应的权重相关联
      matchFields   按节点字段列出的节点选择器要求列表
      matchExpressions   按节点标签列出的节点选择器要求列表(推荐)
        key    键
        values 值
        operator 关系符 支持In, NotIn, Exists, DoesNotExist, Gt, Lt
	weight 倾向权重,在范围1-100。
2
3
4
5
6
7
8
9
10
11
12
13
14
15
16
关系符的使用说明:

- matchExpressions:
  - key: nodeenv              # 匹配存在标签的key为nodeenv的节点
    operator: Exists
  - key: nodeenv              # 匹配标签的key为nodeenv,且value是"xxx"或"yyy"的节点
    operator: In
    values: ["xxx","yyy"]
  - key: nodeenv              # 匹配标签的key为nodeenv,且value大于"xxx"的节点
    operator: Gt
    values: "xxx"
2
3
4
5
6
7
8
9
10
11
接下来首先演示一下 requiredDuringSchedulingIgnoredDuringExecution , 创建 pod-nodeaffinity-required.yaml
apiVersion: v1
kind: Pod
metadata:
  name: pod-nodeaffinity-required
  namespace: dev
spec:
  containers:
  - name: nginx
    image: nginx:1.17.1
  affinity:  #亲和性设置
    nodeAffinity: #设置node亲和性
      requiredDuringSchedulingIgnoredDuringExecution: # 硬限制
        nodeSelectorTerms:
        - matchExpressions: # 匹配env的值在["xxx","yyy"]中的标签
          - key: nodeenv
            operator: In
            values: ["xxx","yyy"]
2
3
4
5
6
7
8
9
10
11
12
13
14
15
16
17
# 创建pod
[root@k8s-master01 ~]# kubectl create -f pod-nodeaffinity-required.yaml
pod/pod-nodeaffinity-required created

# 查看pod状态 (运行失败)
[root@k8s-master01 ~]# kubectl get pods pod-nodeaffinity-required -n dev -o wide
NAME                        READY   STATUS    RESTARTS   AGE   IP       NODE    ......
pod-nodeaffinity-required   0/1     Pending   0          16s   <none>   <none>  ......

# 查看Pod的详情
# 发现调度失败,提示node选择失败
[root@k8s-master01 ~]# kubectl describe pod pod-nodeaffinity-required -n dev
......
  Warning  FailedScheduling  <unknown>  default-scheduler  0/3 nodes are available: 3 node(s) didn't match node selector.
  Warning  FailedScheduling  <unknown>  default-scheduler  0/3 nodes are available: 3 node(s) didn't match node selector.

#接下来,停止pod
[root@k8s-master01 ~]# kubectl delete -f pod-nodeaffinity-required.yaml
pod "pod-nodeaffinity-required" deleted

# 修改文件,将values: ["xxx","yyy"]------> ["pro","yyy"]
[root@k8s-master01 ~]# vim pod-nodeaffinity-required.yaml

# 再次启动
[root@k8s-master01 ~]# kubectl create -f pod-nodeaffinity-required.yaml
pod/pod-nodeaffinity-required created

# 此时查看,发现调度成功,已经将pod调度到了node1上
[root@k8s-master01 ~]# kubectl get pods pod-nodeaffinity-required -n dev -o wide
NAME                        READY   STATUS    RESTARTS   AGE   IP            NODE  ......
pod-nodeaffinity-required   1/1     Running   0          11s   10.244.1.89   node1 ......
2
3
4
5
6
7
8
9
10
11
12
13
14
15
16
17
18
19
20
21
22
23
24
25
26
27
28
29
30
31
接下来再演示一下 requiredDuringSchedulingIgnoredDuringExecution , 创建 pod-nodeaffinity-preferred.yaml
apiVersion: v1
kind: Pod
metadata:
  name: pod-nodeaffinity-preferred
  namespace: dev
spec:
  containers:
  - name: nginx
    image: nginx:1.17.1
  affinity:  #亲和性设置
    nodeAffinity: #设置node亲和性
      preferredDuringSchedulingIgnoredDuringExecution: # 软限制
      - weight: 1
        preference:
          matchExpressions: # 匹配env的值在["xxx","yyy"]中的标签(当前环境没有)
          - key: nodeenv
            operator: In
            values: ["xxx","yyy"]
2
3
4
5
6
7
8
9
10
11
12
13
14
15
16
17
18
# 创建pod
[root@k8s-master01 ~]# kubectl create -f pod-nodeaffinity-preferred.yaml
pod/pod-nodeaffinity-preferred created

# 查看pod状态 (运行成功)
[root@k8s-master01 ~]# kubectl get pod pod-nodeaffinity-preferred -n dev
NAME                         READY   STATUS    RESTARTS   AGE
pod-nodeaffinity-preferred   1/1     Running   0          40s
2
3
4
5
6
7
8
NodeAffinity 规则设置的注意事项:
1 如果同时定义了 nodeSelector 和 nodeAffinity,那么必须两个条件都得到满足,Pod 才能运行在指定的 Node 上
2 如果 nodeAffinity 指定了多个 nodeSelectorTerms,那么只需要其中一个能够匹配成功即可
3 如果一个 nodeSelectorTerms 中有多个 matchExpressions ,则一个节点必须满足所有的才能匹配成功
4 如果一个 pod 所在的 Node 在 Pod 运行期间其标签发生了改变,不再符合该 Pod 的节点亲和性需求,则系统将忽略此变化
PodAffinity
PodAffinity 主要实现以运行的 Pod 为参照,实现让新创建的 Pod 跟参照 pod 在一个区域的功能。首先来看一下 PodAffinity 的可配置项:
pod.spec.affinity.podAffinity
  requiredDuringSchedulingIgnoredDuringExecution  硬限制
    namespaces       指定参照pod的namespace
    topologyKey      指定调度作用域
    labelSelector    标签选择器
      matchExpressions  按节点标签列出的节点选择器要求列表(推荐)
        key    键
        values 值
        operator 关系符 支持In, NotIn, Exists, DoesNotExist.
      matchLabels    指多个matchExpressions映射的内容
  preferredDuringSchedulingIgnoredDuringExecution 软限制
    podAffinityTerm  选项
      namespaces
      topologyKey
      labelSelector
        matchExpressions
          key    键
          values 值
          operator
        matchLabels
    weight 倾向权重,在范围1-100
2
3
4
5
6
7
8
9
10
11
12
13
14
15
16
17
18
19
20
21
topologyKey 用于指定调度时作用域,例如:
如果指定为 kubernetes.io/hostname,那就是以 Node 节点为区分范围
如果指定为 beta.kubernetes.io/os, 则以 Node 节点的操作系统类型来区分
接下来,演示下 requiredDuringSchedulingIgnoredDuringExecution
1)首先创建一个参照 Pod,pod-podaffinity-target.yaml:
apiVersion: v1
kind: Pod
metadata:
  name: pod-podaffinity-target
  namespace: dev
  labels:
    podenv: pro #设置标签
spec:
  containers:
  - name: nginx
    image: nginx:1.17.1
  nodeName: node1 # 将目标pod名确指定到node1上
2
3
4
5
6
7
8
9
10
11
12
# 启动目标pod
[root@k8s-master01 ~]# kubectl create -f pod-podaffinity-target.yaml
pod/pod-podaffinity-target created

# 查看pod状况
[root@k8s-master01 ~]# kubectl get pods  pod-podaffinity-target -n dev
NAME                     READY   STATUS    RESTARTS   AGE
pod-podaffinity-target   1/1     Running   0          4s
2
3
4
5
6
7
8
2)创建 pod-podaffinity-required.yaml,内容如下:
apiVersion: v1
kind: Pod
metadata:
  name: pod-podaffinity-required
  namespace: dev
spec:
  containers:
  - name: nginx
    image: nginx:1.17.1
  affinity:  #亲和性设置
    podAffinity: #设置pod亲和性
      requiredDuringSchedulingIgnoredDuringExecution: # 硬限制
      - labelSelector:
          matchExpressions: # 匹配env的值在["xxx","yyy"]中的标签
          - key: podenv
            operator: In
            values: ["xxx","yyy"]
        topologyKey: kubernetes.io/hostname
2
3
4
5
6
7
8
9
10
11
12
13
14
15
16
17
18
上面配置表达的意思是:新 Pod 必须要与拥有标签 nodeenv=xxx 或者 nodeenv=yyy 的 pod 在同一 Node 上,显然现在没有这样 pod,接下来,运行测试一下。
# 启动pod
[root@k8s-master01 ~]# kubectl create -f pod-podaffinity-required.yaml
pod/pod-podaffinity-required created

# 查看pod状态,发现未运行
[root@k8s-master01 ~]# kubectl get pods pod-podaffinity-required -n dev
NAME                       READY   STATUS    RESTARTS   AGE
pod-podaffinity-required   0/1     Pending   0          9s

# 查看详细信息
[root@k8s-master01 ~]# kubectl describe pods pod-podaffinity-required  -n dev
......
Events:
  Type     Reason            Age        From               Message
  ----     ------            ----       ----               -------
  Warning  FailedScheduling  <unknown>  default-scheduler  0/3 nodes are available: 2 node(s) didn't match pod affinity rules, 1 node(s) had taints that the pod didn't tolerate.

# 接下来修改  values: ["xxx","yyy"]----->values:["pro","yyy"]
# 意思是:新Pod必须要与拥有标签nodeenv=xxx或者nodeenv=yyy的pod在同一Node上
[root@k8s-master01 ~]# vim pod-podaffinity-required.yaml

# 然后重新创建pod,查看效果
[root@k8s-master01 ~]# kubectl delete -f  pod-podaffinity-required.yaml
pod "pod-podaffinity-required" deleted
[root@k8s-master01 ~]# kubectl create -f pod-podaffinity-required.yaml
pod/pod-podaffinity-required created

# 发现此时Pod运行正常
[root@k8s-master01 ~]# kubectl get pods pod-podaffinity-required -n dev
NAME                       READY   STATUS    RESTARTS   AGE   LABELS
pod-podaffinity-required   1/1     Running   0          6s    <none>
2
3
4
5
6
7
8
9
10
11
12
13
14
15
16
17
18
19
20
21
22
23
24
25
26
27
28
29
30
31
关于 PodAffinity 的 preferredDuringSchedulingIgnoredDuringExecution ,这里不再演示。
PodAntiAffinity
PodAntiAffinity 主要实现以运行的 Pod 为参照,让新创建的 Pod 跟参照 pod 不在一个区域中的功能。
它的配置方式和选项跟 PodAffinty 是一样的,这里不再做详细解释,直接做一个测试案例。
1)继续使用上个案例中目标 pod
[root@k8s-master01 ~]# kubectl get pods -n dev -o wide --show-labels
NAME                     READY   STATUS    RESTARTS   AGE     IP            NODE    LABELS
pod-podaffinity-required 1/1     Running   0          3m29s   10.244.1.38   node1   <none>
pod-podaffinity-target   1/1     Running   0          9m25s   10.244.1.37   node1   podenv=pro
2
3
4
2)创建 pod-podantiaffinity-required.yaml,内容如下:
apiVersion: v1
kind: Pod
metadata:
  name: pod-podantiaffinity-required
  namespace: dev
spec:
  containers:
  - name: nginx
    image: nginx:1.17.1
  affinity:  #亲和性设置
    podAntiAffinity: #设置pod亲和性
      requiredDuringSchedulingIgnoredDuringExecution: # 硬限制
      - labelSelector:
          matchExpressions: # 匹配podenv的值在["pro"]中的标签
          - key: podenv
            operator: In
            values: ["pro"]
        topologyKey: kubernetes.io/hostname
2
3
4
5
6
7
8
9
10
11
12
13
14
15
16
17
18
上面配置表达的意思是:新 Pod 必须要与拥有标签 nodeenv=pro 的 pod 不在同一 Node 上,运行测试一下。
# 创建pod
[root@k8s-master01 ~]# kubectl create -f pod-podantiaffinity-required.yaml
pod/pod-podantiaffinity-required created

# 查看pod
# 发现调度到了node2上
[root@k8s-master01 ~]# kubectl get pods pod-podantiaffinity-required -n dev -o wide
NAME                           READY   STATUS    RESTARTS   AGE   IP            NODE   ..
pod-podantiaffinity-required   1/1     Running   0          30s   10.244.1.96   node2  ..
2
3
4
5
6
7
8
9
# 污点和容忍
污点(Taints)
前面的调度方式都是站在 Pod 的角度上,通过在 Pod 上添加属性,来确定 Pod 是否要调度到指定的 Node 上,其实我们也可以站在 Node 的角度上,通过在 Node 上添加污点属性,来决定是否允许 Pod 调度过来。
Node 被设置上污点之后就和 Pod 之间存在了一种相斥的关系,进而拒绝 Pod 调度进来,甚至可以将已经存在的 Pod 驱逐出去。
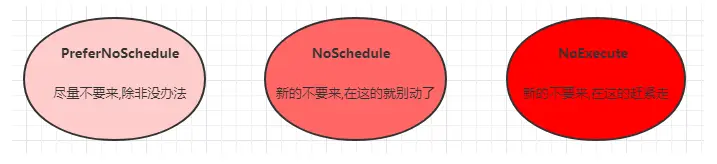
污点的格式为: key=value:effect , key 和 value 是污点的标签,effect 描述污点的作用,支持如下三个选项:
- PreferNoSchedule:kubernetes 将尽量避免把 Pod 调度到具有该污点的 Node 上,除非没有其他节点可调度
- NoSchedule:kubernetes 将不会把 Pod 调度到具有该污点的 Node 上,但不会影响当前 Node 上已存在的 Pod
- NoExecute:kubernetes 将不会把 Pod 调度到具有该污点的 Node 上,同时也会将 Node 上已存在的 Pod 驱离
使用 kubectl 设置和去除污点的命令示例如下:
# 设置污点
kubectl taint nodes 节点名称 key=value:effect

# 去除污点
kubectl taint nodes 节点名称 key:effect-

# 去除所有污点
kubectl taint nodes 节点名称 key-
2
3
4
5
6
7
8
接下来,演示下污点的效果:
- 准备节点 node1(为了演示效果更加明显,暂时停止 node2 节点)
- 为 node1 节点设置一个污点:
tag=heima:PreferNoSchedule;然后创建 pod1 (pod1 可以) - 修改为 node1 节点设置一个污点:
tag=heima:NoSchedule;然后创建 pod2 (pod1 正常 pod2 失败) - 修改为 node1 节点设置一个污点:
tag=heima:NoExecute;然后创建 pod3 (3 个 pod 都失败)
# 为node1设置污点(PreferNoSchedule)
[root@k8s-master01 ~]# kubectl taint nodes node1 tag=heima:PreferNoSchedule

# 创建pod1
[root@k8s-master01 ~]# kubectl run taint1 --image=nginx:1.17.1 -n dev
[root@k8s-master01 ~]# kubectl get pods -n dev -o wide
NAME                      READY   STATUS    RESTARTS   AGE     IP           NODE
taint1-7665f7fd85-574h4   1/1     Running   0          2m24s   10.244.1.59   node1

# 为node1设置污点(取消PreferNoSchedule,设置NoSchedule)
[root@k8s-master01 ~]# kubectl taint nodes node1 tag:PreferNoSchedule-
[root@k8s-master01 ~]# kubectl taint nodes node1 tag=heima:NoSchedule

# 创建pod2
[root@k8s-master01 ~]# kubectl run taint2 --image=nginx:1.17.1 -n dev
[root@k8s-master01 ~]# kubectl get pods taint2 -n dev -o wide
NAME                      READY   STATUS    RESTARTS   AGE     IP            NODE
taint1-7665f7fd85-574h4   1/1     Running   0          2m24s   10.244.1.59   node1
taint2-544694789-6zmlf    0/1     Pending   0          21s     <none>        <none>

# 为node1设置污点(取消NoSchedule,设置NoExecute)
[root@k8s-master01 ~]# kubectl taint nodes node1 tag:NoSchedule-
[root@k8s-master01 ~]# kubectl taint nodes node1 tag=heima:NoExecute

# 创建pod3
[root@k8s-master01 ~]# kubectl run taint3 --image=nginx:1.17.1 -n dev
[root@k8s-master01 ~]# kubectl get pods -n dev -o wide
NAME                      READY   STATUS    RESTARTS   AGE   IP       NODE     NOMINATED
taint1-7665f7fd85-htkmp   0/1     Pending   0          35s   <none>   <none>   <none>
taint2-544694789-bn7wb    0/1     Pending   0          35s   <none>   <none>   <none>
taint3-6d78dbd749-tktkq   0/1     Pending   0          6s    <none>   <none>   <none>
2
3
4
5
6
7
8
9
10
11
12
13
14
15
16
17
18
19
20
21
22
23
24
25
26
27
28
29
30
31
使用 kubeadm 搭建的集群,默认就会给 master 节点添加一个污点标记,所以 pod 就不会调度到 master 节点上.
容忍(Toleration)
上面介绍了污点的作用,我们可以在 node 上添加污点用于拒绝 pod 调度上来,但是如果就是想将一个 pod 调度到一个有污点的 node 上去,这时候应该怎么做呢?这就要使用到容忍。
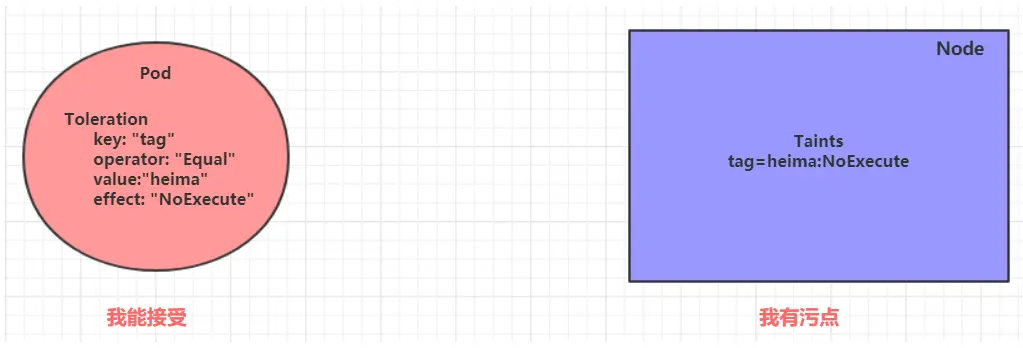
污点就是拒绝,容忍就是忽略,Node 通过污点拒绝 pod 调度上去,Pod 通过容忍忽略拒绝
下面先通过一个案例看下效果:
- 上一小节,已经在 node1 节点上打上了
NoExecute的污点,此时 pod 是调度不上去的 - 本小节,可以通过给 pod 添加容忍,然后将其调度上去
创建 pod-toleration.yaml, 内容如下
apiVersion: v1
kind: Pod
metadata:
  name: pod-toleration
  namespace: dev
spec:
  containers:
  - name: nginx
    image: nginx:1.17.1
  tolerations:      # 添加容忍
  - key: "tag"        # 要容忍的污点的key
    operator: "Equal" # 操作符
    value: "heima"    # 容忍的污点的value
    effect: "NoExecute"   # 添加容忍的规则,这里必须和标记的污点规则相同
2
3
4
5
6
7
8
9
10
11
12
13
14
# 添加容忍之前的pod
[root@k8s-master01 ~]# kubectl get pods -n dev -o wide
NAME             READY   STATUS    RESTARTS   AGE   IP       NODE     NOMINATED
pod-toleration   0/1     Pending   0          3s    <none>   <none>   <none>

# 添加容忍之后的pod
[root@k8s-master01 ~]# kubectl get pods -n dev -o wide
NAME             READY   STATUS    RESTARTS   AGE   IP            NODE    NOMINATED
pod-toleration   1/1     Running   0          3s    10.244.1.62   node1   <none>
2
3
4
5
6
7
8
9
下面看一下容忍的详细配置:
[root@k8s-master01 ~]# kubectl explain pod.spec.tolerations
......
FIELDS:
   key
   value
   operator
   effect
   tolerationSeconds
2
3
4
5
6
7
8
- key 对应着要容忍的污点的键,空意味着匹配所有的键
- value 对应着要容忍的污点的值
- operator key-value 的运算符,支持 Equal 和 Exists(默认)
- effect 对应污点的 effect,空意味着匹配所有影响
- tolerationSeconds 容忍时间,当 effect 为 NoExecute 时生效,表示 pod 在 Node 上的停留时间