 核心内容拆解 事件通知
在 Spring 框架中,Event 代表着一个应用程序中的事件。这些事件可以是任何类型的状态变化,如用户操作、数据更新和系统错误等等。我们可以使用 Event 来实现应用程序内部的通信和协作。通过观察者模式,我们可以让不同的组件在特定的事件发生时做出响应,从而实现松耦合的设计。
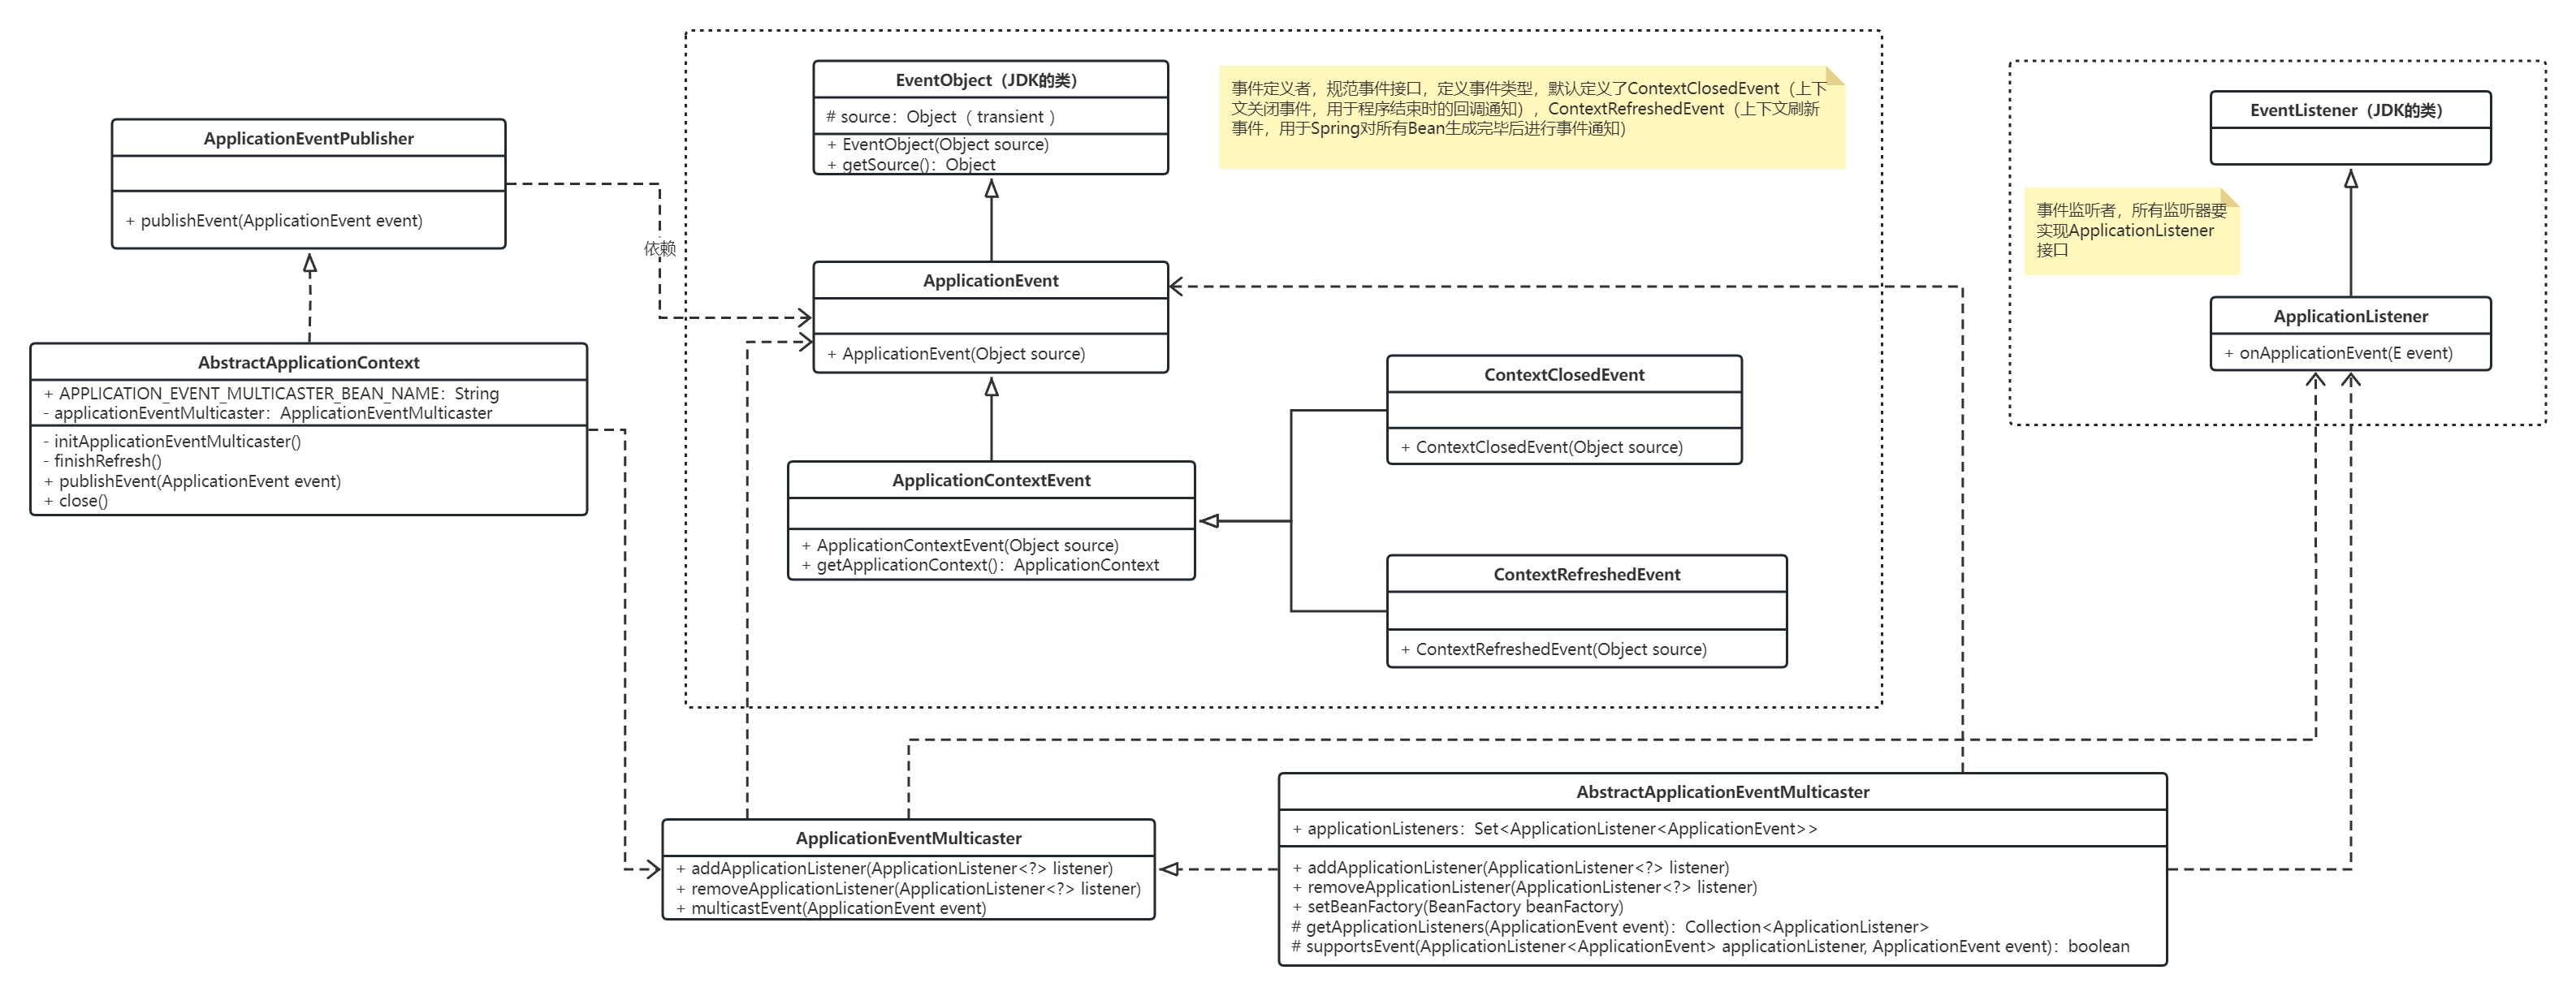
Spring 提供了一个简单而强大的机制来处理 Event,即 ApplicationEvent 和 ApplicationListener 接口。ApplicationEvent 是一个基本的事件类,它可以被继承以实现各种类型的事件。ApplicationListener 接口则定义了一个监听器,在某个事件发生时触发回调方法。以下提供了基本的类图关系,其中 AbstractApplicationContext 是执行 Spring 所有核心方法的集成类:
Spring 提供了许多不同类型的 Event,每种 Event 都有其特定的作用和用途。下面是 Spring 生命周期中提供的 Event 及其作用:
- ContextRefreshedEvent:表示 ApplicationContext 已经初始化并且准备好接受请求。通常情况下,我们可以利用该事件来进行一些初始化操作。
- ContextStartedEvent:表示 ApplicationContext 正在启动。当应用程序中有需要在启动时执行的操作时,可以使用该事件进行处理。
- ContextStoppedEvent:表示 ApplicationContext 已停止。当需要在应用程序停止前执行某些操作时,可以使用该事件。
- ContextClosedEvent:表示 ApplicationContext 已经关闭。与 ContextStoppedEvent 不同,ContextClosedEvent 是在 ApplicationContext 关闭之后发送的,它允许我们对资源进行完全释放。
- RequestHandledEvent:表示一个 HTTP 请求已经被处理完毕。该事件通常用于记录或统计请求处理的性能数据。
在 Spring 中,我们可以通过实现 ApplicationListener 接口或使用 @EventListener 注解来监听这些事件。以监听 ContextRefreshedEvent 为例,我们可以编写如下代码:
@Component
public class MyListener implements ApplicationListener<ContextRefreshedEvent> {
    @Override
    public void onApplicationEvent(ContextRefreshedEvent event) {
        // 在此处编写需要执行的逻辑
    }
}
2
3
4
5
6
7
除了实现 ApplicationListener 接口外,我们还可以使用 @EventListener 注解来监听事件。例如,我们可以在 Spring 组件中添加如下方法:
@EventListener
public void handleContextRefreshedEvent(ContextRefreshedEvent event) {
    // 在此处编写需要执行的逻辑
}
2
3
4
要使用 Spring 提供的类自定义一个事件发布和监听,首先,我们需要定义一个自定义事件。可以创建一个继承自 ApplicationEvent 的类,并在其中添加自定义字段和方法
public class MyCustomEvent extends ApplicationEvent {
    private String message;
    public MyCustomEvent(Object source, String message) {
        super(source);
        this.message = message;
    }
    public String getMessage() {
        return message;
    }
}
2
3
4
5
6
7
8
9
10
发布事件 一旦定义了自定义事件,我们就可以使用 ApplicationContext 的 publishEvent 方法来发布事件
@Autowired
private ApplicationContext applicationContext;

public void doSomethingAndPublishEvent() {
    // 在此处执行业务逻辑
    MyCustomEvent event = new MyCustomEvent(this, "Hello, world!");
    applicationContext.publishEvent(event);
}
2
3
4
5
6
7
8
监听事件 最后,我们需要创建一个事件监听器,以便处理自定义事件。可以创建一个实现 ApplicationListener 接口的类,并在其 onApplicationEvent 方法中添加处理逻辑
@Component
public class MyCustomEventListener implements ApplicationListener<MyCustomEvent> {
    @Override
    public void onApplicationEvent(MyCustomEvent event) {
        System.out.println("Received custom event - " + event.getMessage());
    }
}
2
3
4
5
6
7
这样,当 MyCustomEvent 事件被发布时,MyCustomEventListener 就会收到该事件并调用其 onApplicationEvent 方法进行处理。