 SpringCloud - 分布式事务三(Seata搭建)
深度理解 Seata 我就不说了,我也是一知半解,但我会把我理解的部分在以下阐述。Seata 官网 (opens new window)
# 搭建 seata-server
在搭建之前,大家一定要理解 seata 的核心角色以及之间的通信关系,Seata 分 TC、TM 和 RM 三个角色,TC(Server 端)为单独服务端部署,TM 和 RM(Client 端)由业务系统集成。
TC (Transaction Coordinator) - 事务协调者
维护全局和分支事务的状态,驱动全局事务提交或回滚。TM (Transaction Manager) - 事务管理器
定义全局事务的范围:开始全局事务、提交或回滚全局事务。RM (Resource Manager) - 资源管理器
管理分支事务处理的资源,与 TC 交谈以注册分支事务和报告分支事务的状态,并驱动分支事务提交或回滚。
# 正式开始搭建 (TC)
- seata-server 下载地址 (opens new window),下载完成后解压缩。
- 修改 seata/conf/file.conf 文件,这个文件里是存储事务日志的。我使用的是 DB 存储。
## transaction log store, only used in seata-server
store {
  ## store mode: file、db、redis
  mode = "db"

  ## file store property
  file {
    ## store location dir
    dir = "sessionStore"
    # branch session size , if exceeded first try compress lockkey, still exceeded throws exceptions
    maxBranchSessionSize = 16384
    # globe session size , if exceeded throws exceptions
    maxGlobalSessionSize = 512
    # file buffer size , if exceeded allocate new buffer
    fileWriteBufferCacheSize = 16384
    # when recover batch read size
    sessionReloadReadSize = 100
    # async, sync
    flushDiskMode = async
  }

  ## database store property
  db {
    ## the implement of javax.sql.DataSource, such as DruidDataSource(druid)/BasicDataSource(dbcp)/HikariDataSource(hikari) etc.
    datasource = "druid"
    ## mysql/oracle/postgresql/h2/oceanbase etc.
    dbType = "mysql"
    driverClassName = "com.mysql.cj.jdbc.Driver"
    url = "jdbc:mysql://0.0.0.0:3306/seata?useUnicode=true&characterEncoding=UTF-8&autoReconnect=true&useSSL=false&zeroDateTimeBehavior=convertToNull&&serverTimezone=Asia/Shanghai"
    user = "dev"
    password = "mysql@dev.2020"
    minConn = 5
    maxConn = 30
    globalTable = "global_table"
    branchTable = "branch_table"
    lockTable = "lock_table"
    queryLimit = 100
    maxWait = 5000
  }

  ## redis store property
  redis {
    host = "127.0.0.1"
    port = "6379"
    password = ""
    database = "0"
    minConn = 1
    maxConn = 10
    queryLimit = 100
  }
}
2
3
4
5
6
7
8
9
10
11
12
13
14
15
16
17
18
19
20
21
22
23
24
25
26
27
28
29
30
31
32
33
34
35
36
37
38
39
40
41
42
43
44
45
46
47
48
49
50
51
- 修改 seata/conf/registry.conf 文件,这个文件是用来修改 seata-server 的注册方式,你可以把 seata-server 单独当成一个服务,但既然是服务那么是不是要考虑一个 seata-server 蹦了怎么办?所以这里提供了集群的注册方式。
# 这里是服务注册,默认是file,也就是单机,我这里使用了nacos服务管理
registry {
  # file 、nacos 、eureka、redis、zk、consul、etcd3、sofa
  type = "nacos"

  nacos {
    application = "seata-server"
    serverAddr = "192.168.200.89:8848"
    group = "SEATA_GROUP"
    namespace = ""
    cluster = "default"
    username = "nacos"
    password = "nacos@root@2020"
  }
  eureka {
    serviceUrl = "http://localhost:8761/eureka"
    application = "default"
    weight = "1"
  }
  redis {
    serverAddr = "localhost:6379"
    db = 0
    password = ""
    cluster = "default"
    timeout = 0
  }
  zk {
    cluster = "default"
    serverAddr = "127.0.0.1:2181"
    sessionTimeout = 6000
    connectTimeout = 2000
    username = ""
    password = ""
  }
  consul {
    cluster = "default"
    serverAddr = "127.0.0.1:8500"
  }
  etcd3 {
    cluster = "default"
    serverAddr = "http://localhost:2379"
  }
  sofa {
    serverAddr = "127.0.0.1:9603"
    application = "default"
    region = "DEFAULT_ZONE"
    datacenter = "DefaultDataCenter"
    cluster = "default"
    group = "SEATA_GROUP"
    addressWaitTime = "3000"
  }
  file {
    name = "file.conf"
  }
}

# 配置文件读取的方式,默认也是file(file.conf),读取的本地文件,我们使用nacos,让他读取nacos上的配置,所以上面配置的 file.conf里的内容基本没用。
config {
  # file、nacos 、apollo、zk、consul、etcd3
  type = "nacos"

  nacos {
    serverAddr = "192.168.200.89:8848"
    namespace = ""
    group = "SEATA_GROUP"
    username = "nacos"
    password = "nacos@root@2020"
  }
  consul {
    serverAddr = "127.0.0.1:8500"
  }
  apollo {
    appId = "seata-server"
    apolloMeta = "http://192.168.1.204:8801"
    namespace = "application"
  }
  zk {
    serverAddr = "127.0.0.1:2181"
    sessionTimeout = 6000
    connectTimeout = 2000
    username = ""
    password = ""
  }
  etcd3 {
    serverAddr = "http://localhost:2379"
  }
  file {
    name = "file.conf"
  }
}
2
3
4
5
6
7
8
9
10
11
12
13
14
15
16
17
18
19
20
21
22
23
24
25
26
27
28
29
30
31
32
33
34
35
36
37
38
39
40
41
42
43
44
45
46
47
48
49
50
51
52
53
54
55
56
57
58
59
60
61
62
63
64
65
66
67
68
69
70
71
72
73
74
75
76
77
78
79
80
81
82
83
84
85
86
87
88
89
90
到这里基本的 seata-server 就算是配置好了。 注意我代码里也有文字说明。
# 创建 seata 数据库
TC 全局事务会话信息由 3 块内容构成,全局事务 --> 分支事务 --> 全局锁,对应表 global_table、branch_table、lock_table。
表结构 (opens new window)
# nacos 配置
对于 nacos 还不会的小伙伴可以看我之前写的 nacos 文章
nacos 搭建好了之后,我们需要把在 seata/conf/registry.conf 里写的 config 内容配置到 nacos 里,步骤如下:
- 随便在一个文件下建 setat-config 文件夹,然后在 setat-config/nacos/nacos-config.sh,具体内容如下:
#!/usr/bin/env bash
# Copyright 1999-2019 Seata.io Group.
#
# Licensed under the Apache License, Version 2.0 (the "License");
# you may not use this file except in compliance with the License.
# You may obtain a copy of the License at、
#
#      http://www.apache.org/licenses/LICENSE-2.0
#
# Unless required by applicable law or agreed to in writing, software
# distributed under the License is distributed on an "AS IS" BASIS,
# WITHOUT WARRANTIES OR CONDITIONS OF ANY KIND, either express or implied.
# See the License for the specific language governing permissions and
# limitations under the License.

while getopts ":h:p:g:t:" opt
do
  case $opt in
  h)
    host=$OPTARG
    ;;
  p)
    port=$OPTARG
    ;;
  g)
    group=$OPTARG
    ;;
  t)
    tenant=$OPTARG
    ;;
  ?)
    echo " USAGE OPTION: $0 [-h host] [-p port] [-g group] [-t tenant] "
    exit 1
    ;;
  esac
done

if [[ -z ${host} ]]; then
    host=localhost
fi
if [[ -z ${port} ]]; then
    port=8848
fi
if [[ -z ${group} ]]; then
    group="SEATA_GROUP"
fi
if [[ -z ${tenant} ]]; then
    tenant=""
fi

nacosAddr=$host:$port
contentType="content-type:application/json;charset=UTF-8"

echo "set nacosAddr=$nacosAddr"
echo "set group=$group"

failCount=0
tempLog=$(mktemp -u)
function addConfig() {
  curl -X POST -H "${1}" "http://$2/nacos/v1/cs/configs?dataId=$3&group=$group&content=$4&tenant=$tenant" >"${tempLog}" 2>/dev/null
  if [[ -z $(cat "${tempLog}") ]]; then
    echo " Please check the cluster status. "
    exit 1
  fi
  if [[ $(cat "${tempLog}") =~ "true" ]]; then
    echo "Set $3=$4 successfully "
  else
    echo "Set $3=$4 failure "
    (( failCount++ ))
  fi
}

count=0
for line in $(cat $(dirname "$PWD")/config.txt | sed s/[[:space:]]//g); do
  (( count++ ))
	key=${line%%=*}
  value=${line#*=}
	addConfig "${contentType}" "${nacosAddr}" "${key}" "${value}"
done

echo "========================================================================="
echo " Complete initialization parameters,  total-count:$count ,  failure-count:$failCount "
echo "========================================================================="

if [[ ${failCount} -eq 0 ]]; then
	echo " Init nacos config finished, please start seata-server. "
else
	echo " init nacos config fail. "
fi
2
3
4
5
6
7
8
9
10
11
12
13
14
15
16
17
18
19
20
21
22
23
24
25
26
27
28
29
30
31
32
33
34
35
36
37
38
39
40
41
42
43
44
45
46
47
48
49
50
51
52
53
54
55
56
57
58
59
60
61
62
63
64
65
66
67
68
69
70
71
72
73
74
75
76
77
78
79
80
81
82
83
84
85
86
87
88
89
配置内容来自:阿里 seata config-center (opens new window)
2. 创建 setat-config/config.txt,内容如下:
service.vgroupMapping.my_test_tx_group=default
store.mode=db
store.db.datasource=druid
store.db.dbType=mysql
store.db.driverClassName=com.mysql.cj.jdbc.Driver
store.db.url=jdbc:mysql://0.0.0.0:3306/seata?useUnicode=true&characterEncoding=UTF-8&autoReconnect=true&useSSL=false&zeroDateTimeBehavior=convertToNull&&serverTimezone=Asia/Shanghai
store.db.user=dev
store.db.password=mysql@dev.2020
store.db.minConn=5
store.db.maxConn=30
store.db.globalTable=global_table
store.db.branchTable=branch_table
store.db.queryLimit=100
store.db.lockTable=lock_table
store.db.maxWait=5000
2
3
4
5
6
7
8
9
10
11
12
13
14
15
- 运行 nacos-config.sh
sh nacos-config.sh -h 192.168.200.89
-h naocs 的地址
会得到如下效果:
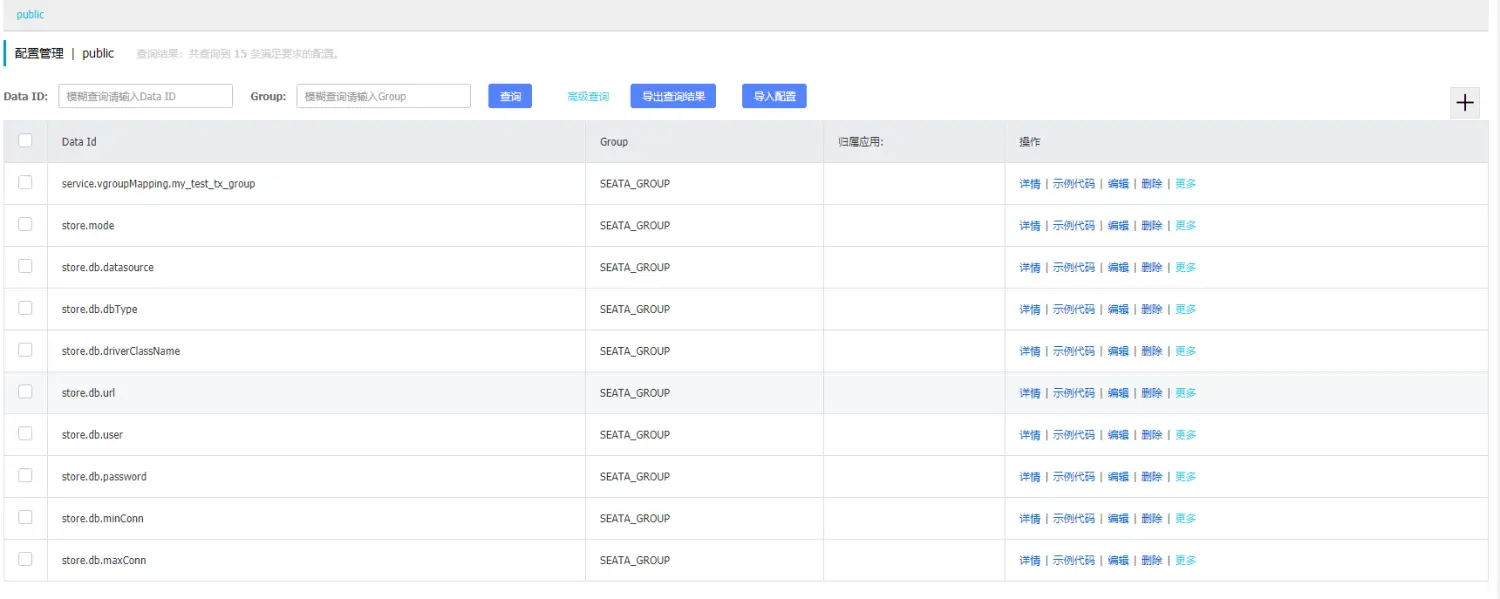
接下来只需要 启动 seata-server 服务,然后能在 nacos 服务列表中看到 seata-server 就算搭建完成。后面我会先搭建一个 多数据源的事务处理。
官方提供:
Seata 整合教程:https://www.bilibili.com/video/BV1tz411z7BX/ (opens new window)
文字版教程 https://mp.weixin.qq.com/s/2KSidJ72YsovpJ94P1aK1g (opens new window)
springcloud 整合 demo:
https://gitee.com/itCjb/spring-cloud-alibaba-seata-demo (opens new window)
https://github.com/lightClouds917/springcloud-eureka-feign-mybatis-seata-v100 (opens new window)