 Spring Boot 集成 FastDFS
# 安装 FastDFS
# 系统软件
| 名称 | 说明 |
|---|---|
| centos | 7.x |
| libfastcommon | FastDFS 分离出的一些公用函数包 |
| FastDFS | FastDFS 本体 |
| fastdfs-nginx-module | FastDFS 和 nginx 的关联模块 |
| nginx | nginx-1.18.0 |
# 编译环境
yum install git gcc gcc-c++ make automake autoconf libtool pcre pcre-devel zlib zlib-devel openssl-devel wget vim -y
1
如果出现以下错误
Loaded plugins: fastestmirror
Loading mirror speeds from cached hostfile
 * base: mirrors.cn99.com
 * centos-sclo-rh: mirrors.cn99.com
 * centos-sclo-sclo: mirrors.ustc.edu.cn
 * epel: ftp.yz.yamagata-u.ac.jp
 * extras: mirrors.cn99.com
 * updates: mirrors.cn99.com
  File "/usr/libexec/urlgrabber-ext-down", line 28
    except OSError, e:
                  ^
SyntaxError: invalid syntax
  File "/usr/libexec/urlgrabber-ext-down", line 28
    except OSError, e:
                  ^
SyntaxError: invalid syntax
  File "/usr/libexec/urlgrabber-ext-down", line 28
    except OSError, e:
                  ^
SyntaxError: invalid syntax
  File "/usr/libexec/urlgrabber-ext-down", line 28
    except OSError, e:
                  ^
SyntaxError: invalid syntax
  File "/usr/libexec/urlgrabber-ext-down", line 28
    except OSError, e:
                  ^
SyntaxError: invalid syntax
1
2
3
4
5
6
7
8
9
10
11
12
13
14
15
16
17
18
19
20
21
22
23
24
25
26
27
28
2
3
4
5
6
7
8
9
10
11
12
13
14
15
16
17
18
19
20
21
22
23
24
25
26
27
28
修改如下文件
vi /usr/libexec/urlgrabber-ext-down
#把第一行的
#!/usr/bin/python

#修改为,然后重新安装
#!/usr/bin/python2
1
2
3
4
5
6
2
3
4
5
6
# 磁盘目录
| 说明 | 位置 |
|---|---|
| 所有安装包 | /home/dfs/lib |
| 数据存储位置 | /home/dfs/store |
| 这里我为了方便把日志什么的都放到了 | /home/dfs/log |
# 安装 libfastcommon
git clone https://github.com/happyfish100/libfastcommon.git --depth 1
cd libfastcommon/
./make.sh && ./make.sh install #编译安装
1
2
3
2
3
# 安装 FastDFS
cd ../ #返回上一级目录
git clone https://github.com/happyfish100/fastdfs.git --depth 1
cd fastdfs/
./make.sh && ./make.sh install #编译安装
#配置文件准备
cp /etc/fdfs/tracker.conf.sample /etc/fdfs/tracker.conf
cp /etc/fdfs/storage.conf.sample /etc/fdfs/storage.conf
cp /etc/fdfs/client.conf.sample /etc/fdfs/client.conf #客户端文件,测试用
cp /home/dfs/lib/fastdfs/conf/http.conf /etc/fdfs/ #供nginx访问使用
cp /home/dfs/lib/fastdfs/conf/mime.types /etc/fdfs/ #供nginx访问使用
1
2
3
4
5
6
7
8
9
10
2
3
4
5
6
7
8
9
10
# 安装 fastdfs-nginx-module
cd ../ #返回上一级目录
git clone https://github.com/happyfish100/fastdfs-nginx-module.git --depth 1
cp /home/dfs/lib/fastdfs-nginx-module/src/mod_fastdfs.conf /etc/fdfs
1
2
3
2
3
配合 nginx 使用,关于 nginx 安装这里就不说了,安装后 nginx 需要配置如下:
./configure --prefix=/home/nginx-1.18.0 --add-module=/home/dfs/lib/fastdfs-nginx-module/src
1
# 单机部署
# tracker 配置
#服务器ip为 10.24x.3x.xx2
#我建议用ftp下载下来这些文件 本地修改
vim /etc/fdfs/tracker.conf
#需要修改的内容如下
port=22122  # tracker服务器端口(默认22122,一般不修改)
base_path=/home/dfs/log  # 存储日志和数据的根目录
1
2
3
4
5
6
2
3
4
5
6
# storage 配置
vim /etc/fdfs/storage.conf
#需要修改的内容如下
port=23000  # storage服务端口(默认23000,一般不修改)
base_path=/home/dfs/log  # 数据和日志文件存储根目录
store_path0=/home/dfs/store  # 第一个存储目录
tracker_server=10.24x.3x.xx2:22122  # tracker服务器IP和端口
http.server_port=8888  # http访问文件的端口(默认8888,看情况修改,和nginx中保持一致)
1
2
3
4
5
6
7
2
3
4
5
6
7
# 启动
# tracker
/etc/init.d/fdfs_trackerd start #启动tracker服务
/etc/init.d/fdfs_trackerd restart #重启动tracker服务
/etc/init.d/fdfs_trackerd stop #停止tracker服务
chkconfig fdfs_trackerd on #自启动tracker服务
1
2
3
4
2
3
4
# storage
/etc/init.d/fdfs_storaged start #启动storage服务
/etc/init.d/fdfs_storaged restart #重动storage服务
/etc/init.d/fdfs_storaged stop #停止动storage服务
chkconfig fdfs_storaged on #自启动storage服务
1
2
3
4
2
3
4
# client 测试
返回 groupX 意思就是成功了,文件被重新改名字并且被放在了某个地方
vim /etc/fdfs/client.conf
#需要修改的内容如下
base_path=/home/dfs/log
tracker_server=10.24x.3x.xx2:22122    #tracker服务器IP和端口

[root@node102 home]# fdfs_upload_file /etc/fdfs/client.conf /home/start.sh
group1/M00/00/00/CvAeZl_R4uSAfHXSAAACUyTz3No8807.sh
1
2
3
4
5
6
7
2
3
4
5
6
7
不知道可以用以下命令来搜找
[root@node102 home]# find / -name CvAeZl_R4uSAfHXSAAACUyTz3No8807.sh
/home/dfs/store/data/00/00/CvAeZl_R4uSAfHXSAAACUyTz3No8807.sh
1
2
2
# nginx 配置访问
vim /etc/fdfs/mod_fastdfs.conf
#需要修改的内容如下
tracker_server=10.24x.3x.xx2:22122  #tracker服务器IP和端口
url_have_group_name=true
store_path0=/home/dfs/store
#配置nginx.config
vim /home/nginx-1.18.0/conf/nginx.conf
#添加如下配置
server {
    listen       8888;    ## 该端口为storage.conf中的http.server_port相同
    server_name  localhost;
    location ~/group[0-9]/ {
        ngx_fastdfs_module;
    }
    error_page   500 502 503 504  /50x.html;
    location = /50x.html {
    root   html;
    }
}
# 先把8888端口打开
/sbin/iptables -I INPUT -p tcp --dport 8888 -j ACCEPT
#测试下载,用外部浏览器访问刚才已传过的nginx安装包,引用返回的ID
http://10.24x.3x.xx2:8888/group1/M00/00/00/CvAeZl_R4uSAfHXSAAACUyTz3No8807.sh
1
2
3
4
5
6
7
8
9
10
11
12
13
14
15
16
17
18
19
20
21
22
23
2
3
4
5
6
7
8
9
10
11
12
13
14
15
16
17
18
19
20
21
22
23
如果 nginx 启动 unknown directive "ngx_fastdfs_module",则是安装 nginx --add-module=/home/dfs/lib/fastdfs-nginx-module/src 失败,可以用./nginx -V 查看。
[root@node102 sbin]# ./nginx -V
nginx version: nginx/1.18.0
built by gcc 9.3.1 20200408 (Red Hat 9.3.1-2) (GCC)
built with OpenSSL 1.0.2k-fips  26 Jan 2017
TLS SNI support enabled
configure arguments: --add-module=/home/dfs/lib/fastdfs-nginx-module/src --prefix=/home/nginx-1.18.0 --with-http_stub_status_module --with-http_ssl_module --with-http_v2_module --with-pcre=/home/pcre-8.35
1
2
3
4
5
6
2
3
4
5
6
# 分布式部署
# storage 配置
tracker 配置 和单机部署是一样的不变,只需要改变 storage 配置
vim /etc/fdfs/storage.conf
#需要修改的内容如下
port=23000  # storage服务端口(默认23000,一般不修改)
base_path=/home/dfs/log  # 数据和日志文件存储根目录
store_path0=/home/dfs/store  # 第一个存储目录
tracker_server=10.240.3x.xx0:22122  # 服务器1
tracker_server=10.240.3x.xx1:22122  # 服务器2
tracker_server=10.240.3x.xx2:22122  # 服务器3
http.server_port=8888  # http访问文件的端口(默认8888,看情况修改,和nginx中保持一致)
1
2
3
4
5
6
7
8
9
2
3
4
5
6
7
8
9
# client 测试
vim /etc/fdfs/client.conf
#需要修改的内容如下
base_path=/home/moe/dfs
tracker_server=10.240.3x.xx0:22122  # 服务器1
tracker_server=10.240.3x.xx1:22122  # 服务器2
tracker_server=10.240.3x.xx2:22122  # 服务器3
# 保存退出

[root@node102 home]# fdfs_upload_file /etc/fdfs/client.conf /home/start.sh
group1/M00/00/00/CvAeZl_R4uSAfHXSAAACUyTz3No8807.sh
1
2
3
4
5
6
7
8
9
10
2
3
4
5
6
7
8
9
10
# 配置 nginx 访问
vim /etc/fdfs/mod_fastdfs.conf
#需要修改的内容如下
tracker_server=10.240.3x.xx0:22122  # 服务器1
tracker_server=10.240.3x.xx1:22122  # 服务器2
tracker_server=10.240.3x.xx2:22122  # 服务器3
url_have_group_name=true
store_path0=/home/dfs/store
#配置nginx.config
vim /home/nginx-1.18.0/conf/nginx.conf
#添加如下配置
server {
    listen       8888;    ## 该端口为storage.conf中的http.server_port相同
    server_name  localhost;
    location ~/group[0-9]/ {
        ngx_fastdfs_module;
    }
    error_page   500 502 503 504  /50x.html;
    location = /50x.html {
    root   html;
    }
}
1
2
3
4
5
6
7
8
9
10
11
12
13
14
15
16
17
18
19
20
21
2
3
4
5
6
7
8
9
10
11
12
13
14
15
16
17
18
19
20
21
# 集成 SpringBoot
# 引入依赖
<dependency>
    <groupId>com.github.tobato</groupId>
    <artifactId>fastdfs-client</artifactId>
    <version>1.26.7</version>
</dependency>
1
2
3
4
5
2
3
4
5
# 添加配置
fdfs:
  # 连接的超时时间
  connect-timeout: 3000
  # 读取的超时时间
  so-timeout: 3000
  #tracker服务所在的ip地址和端口号
  tracker-list: 10.240.3x.xx2:22122
1
2
3
4
5
6
7
2
3
4
5
6
7
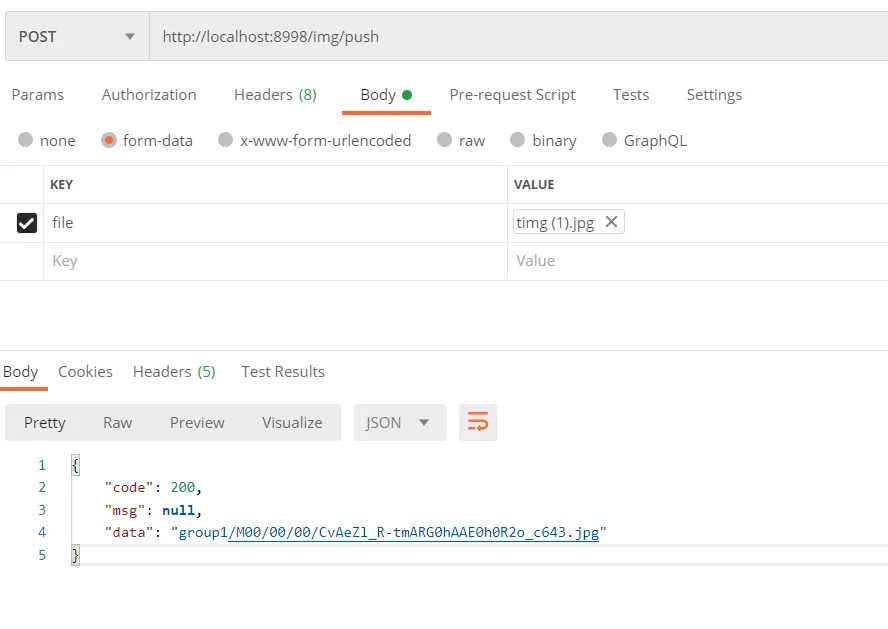
# Controller
@RestController
@RequestMapping("/img")
public class ImgController {

    @Autowired
    private ImgServer imgServer;

    @PostMapping("/push")
    public ResponseData push(@RequestParam("file") MultipartFile file){
        return imgServer.push(file);
    }

}
1
2
3
4
5
6
7
8
9
10
11
12
13
2
3
4
5
6
7
8
9
10
11
12
13
# 实现
@Service
@Slf4j
public class ImgServerImpl implements ImgServer {
    @Autowired
    FastFileStorageClient fastFileStorageClient;

    @Override
    public ResponseData<String> push(MultipartFile file) {
        if (file.isEmpty()) {
            return ResponseData.failureResponse(UploadFileCode.UPLOAD_FILE_CODE_1000);
        }
        try {
            log.info("开始上传 {}", file.getOriginalFilename());
            String fileSuffix = file.getOriginalFilename().substring(file.getOriginalFilename().lastIndexOf(".")+1);
            StorePath storePath = fastFileStorageClient.uploadFile(file.getInputStream(), file.getSize(),fileSuffix, null);
            String path = storePath.getFullPath();
            log.info("上传成功");
            return ResponseData.successResponse(path);
        } catch (IOException e) {
            log.error(e.toString(), e);
            return ResponseData.failureResponse(UploadFileCode.UPLOAD_FILE_CODE_1001.getCode(), e.toString());
        }
    }
}
1
2
3
4
5
6
7
8
9
10
11
12
13
14
15
16
17
18
19
20
21
22
23
24
2
3
4
5
6
7
8
9
10
11
12
13
14
15
16
17
18
19
20
21
22
23
24
上次更新: 1/1/2026, 8:54:37 PM