 SpringBoot 之 Stomp 使用和 vue 相配置
# 后端代码
依赖
<dependency>
    <groupId>org.springframework.boot</groupId>
    <artifactId>spring-boot-starter-websocket</artifactId>
</dependency>
1
2
3
4
2
3
4
import org.springframework.context.annotation.Configuration;
import org.springframework.messaging.simp.config.MessageBrokerRegistry;
import org.springframework.web.socket.config.annotation.EnableWebSocketMessageBroker;
import org.springframework.web.socket.config.annotation.StompEndpointRegistry;
import org.springframework.web.socket.config.annotation.WebSocketMessageBrokerConfigurer;
/**
* 通过EnableWebSocketMessageBroker 开启使用STOMP协议来传输基于代理(message broker)的消息,此时浏览器支持使用@MessageMapping 就像支持@RequestMapping一样。
* @author zhenghuasheng
*/
@Configuration
@EnableWebSocketMessageBroker
public class WebSocketConfig implements WebSocketMessageBrokerConfigurer {
/**
* 注册stomp的端点
*/
@Override
public void registerStompEndpoints(StompEndpointRegistry registry) {
// 用户订阅主题的前缀 /topic 代表发布广播,即群发 /queue 代表点对点,即发指定用户
registry.addEndpoint("/webSocket")
// 设置跨域
.setAllowedOrigins("*")
//添加socket拦截器,用于从请求中获取客户端标识参数 目前没什么用,可以去掉
.addInterceptors(new MyHandShakeInterceptor())
.withSockJS();
}
/**
* 配置消息代理(message broker)
* @param registry
*/
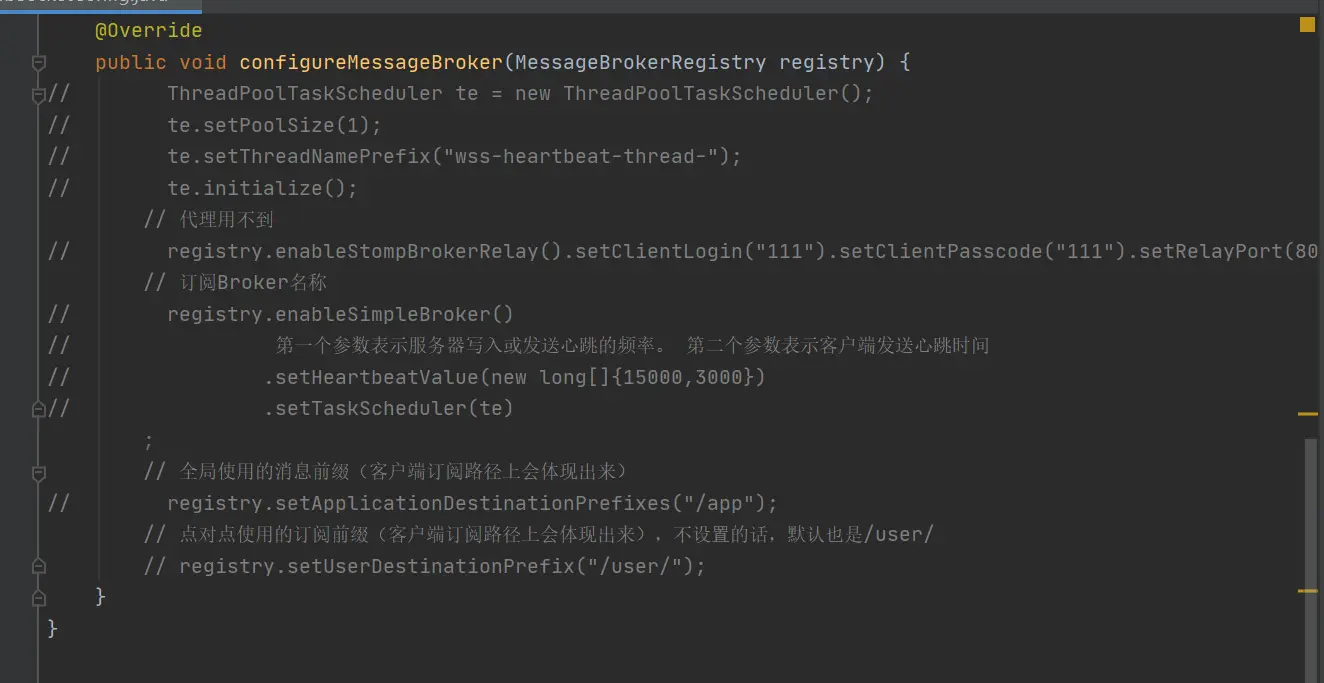
@Override
public void configureMessageBroker(MessageBrokerRegistry registry) {
// ThreadPoolTaskScheduler te = new ThreadPoolTaskScheduler();
// te.setPoolSize(1);
// te.setThreadNamePrefix("wss-heartbeat-thread-");
// te.initialize();
// 代理用不到
// registry.enableStompBrokerRelay().setClientLogin("111").setClientPasscode("111").setRelayPort(8005);
// 订阅Broker名称
registry.enableSimpleBroker("/queue","/topic")
// 第一个参数表示服务器写入或发送心跳的频率。 第二个参数表示客户端发送心跳时间
// .setHeartbeatValue(new long[]{15000,3000})
// .setTaskScheduler(te)
;
// 全局使用的消息前缀(客户端订阅路径上会体现出来)
// registry.setApplicationDestinationPrefixes("/app");
// 点对点使用的订阅前缀(客户端订阅路径上会体现出来),不设置的话,默认也是/user/
// registry.setUserDestinationPrefix("/user/");
}
}
1
2
3
4
5
6
7
8
9
10
11
12
13
14
15
16
17
18
19
20
21
22
23
24
25
26
27
28
29
30
31
32
33
34
35
36
37
38
39
40
41
42
43
44
45
46
47
48
49
50
51
52
2
3
4
5
6
7
8
9
10
11
12
13
14
15
16
17
18
19
20
21
22
23
24
25
26
27
28
29
30
31
32
33
34
35
36
37
38
39
40
41
42
43
44
45
46
47
48
49
50
51
52
# 前端代码
依赖
npm install sockjs-client
npm install stompjs
npm install net
npm install vue-stomp
1
2
3
4
2
3
4
封装 stomp.js
import SockJS from 'sockjs-client'
import Stomp from 'webstomp-client'

export default {
  // 是否启用日志 默认启用
  debug:true,
  // 客户端连接信息
  stompClient:{},
  // 初始化
  init(callBack){
    const socket = new SockJS('http://127.0.0.1:8005/webSocket')
    this.stompClient = Stomp.over(socket)
    this.stompClient.hasDebug = this.debug
    this.stompClient.connect({},suce =>{
      this.console("连接成功,信息如下 ↓");
      this.console(this.stompClient);
      if(callBack){
        callBack();
      }
    },err => {
      if(err) {
        this.console("连接失败,信息如下 ↓")
        this.console(err)
      }
    });
  },
  // 订阅
  sub(address,callBack){
    if(!this.stompClient.connected){
      this.console("没有连接,无法订阅");
      return;
    }
    // 生成 id
    let timestamp= new Date().getTime() + address
    this.console("订阅成功 -> "+address)
    this.stompClient.subscribe(address,message => {
      this.console(address+" 订阅消息通知,信息如下 ↓")
      this.console(message)
      let data = message.body;
      callBack(data);
    },{
      id: timestamp
    })
  },
  unSub(address){
    if(!this.stompClient.connected){
      this.console("没有连接,无法取消订阅 -> "+address);
      return;
    }
    let id = ""
    for(let item in this.stompClient.subscriptions){
      if(item.endsWith(address)){
        id = item;
        break;
      }
    }
    this.stompClient.unsubscribe(id);
    this.console("取消订阅成功 -> id:"+ id + " address:"+address)
  },
  // 断开连接
  disconnect(callBack){
    if(!this.stompClient.connected){
      this.console("没有连接,无法断开连接");
      return;
    }
    this.stompClient.disconnect(() =>{
      console.log("断开成功")
      if(callBack){
        callBack()
      }
    });
  },
  // 单位 秒
  reconnect(time){
    setInterval(() =>{
      if(!this.stompClient.connected){
        this.console("重新连接中...")
        this.init()
      }
    },time * 1000)
  },
  console(msg){
    if(this.debug){
      console.log(msg);
    }
  }
}
1
2
3
4
5
6
7
8
9
10
11
12
13
14
15
16
17
18
19
20
21
22
23
24
25
26
27
28
29
30
31
32
33
34
35
36
37
38
39
40
41
42
43
44
45
46
47
48
49
50
51
52
53
54
55
56
57
58
59
60
61
62
63
64
65
66
67
68
69
70
71
72
73
74
75
76
77
78
79
80
81
82
83
84
85
86
87
2
3
4
5
6
7
8
9
10
11
12
13
14
15
16
17
18
19
20
21
22
23
24
25
26
27
28
29
30
31
32
33
34
35
36
37
38
39
40
41
42
43
44
45
46
47
48
49
50
51
52
53
54
55
56
57
58
59
60
61
62
63
64
65
66
67
68
69
70
71
72
73
74
75
76
77
78
79
80
81
82
83
84
85
86
87
以上是我自己封装的一个 stomp.js,建议在登录之后调用 init,并且保证 订阅 和 init 等所有 API 在一个文件中使用,否则会 undefined。可以使用 eventBus 来传递数据。
具体使用
  mounted() {
    // 初始化
    stomp.init(() =>{
      // 初始化成功 就执行订阅
      stomp.sub("/topic",data =>{
        console.log(data)
      })
      stomp.sub("/topic1",data =>{
        console.log(data)
      })
      // 取消订阅
      stomp.unSub("/topic")
    })
    //  启用重连 5秒检测一次
    stomp.reconnect(5)
  },
  destroyed() {
    stomp.disconnect()
  }
1
2
3
4
5
6
7
8
9
10
11
12
13
14
15
16
17
18
19
2
3
4
5
6
7
8
9
10
11
12
13
14
15
16
17
18
19
连接通了以后,如果说前端用 websocket 只是为了接收后端的消息,那么关于 topic 可以随便设置,这里的随便意思是后端不需要去在 configureMessageBroker 里设置任何东西,只需要和前端定义清楚 topic,后端可以动态 topic 给前端。如下:
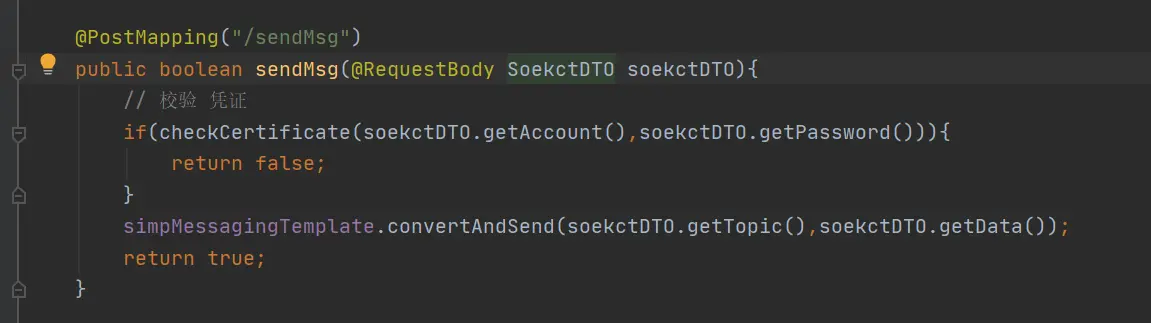


上次更新: 1/1/2026, 8:54:37 PM